
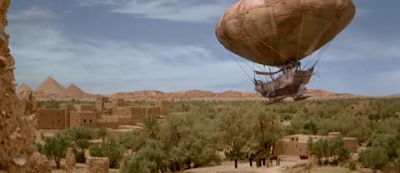
Building a "pulp" boat airship

The model is mainly composed of two parts: the balloon and the boat, which offers a pretty convenient: you can progress on one while the other dry...
A small scheme quickly drawn on the corner of a table, that explains what I had in mind:
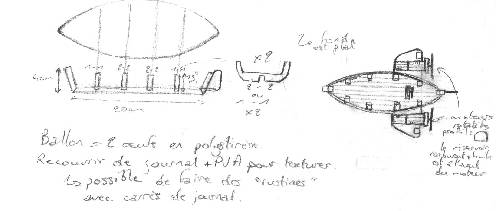
With the intention of clarity for this article, I treat separately the case of the balloon and then the boat, and we'll see how to assemble the two parties.
The balloon
Needed material
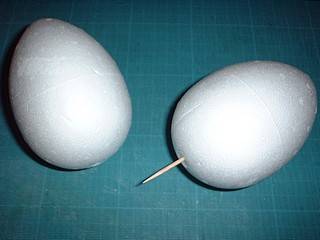
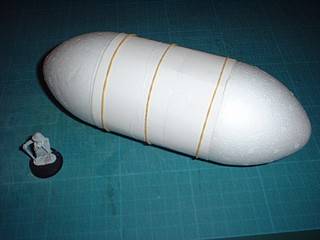
- 2 eggs in polystyrene (found in creative leisure stores, here they have a diameter of 5 cm)
- 1 toothpick
- Cardboard (cereal box type is perfect)
- Newspaper
- Wood glue thinned with water
- Rubber bands
Technique
The construction of the balloon is what I did the much easier from so far! The operation is quite simple:
1. You plug the basis of an egg with the toothpick; you repeat the operation with the second egg to assemble. A little of wood glue on the toothpick is used to strengthen the assembly.
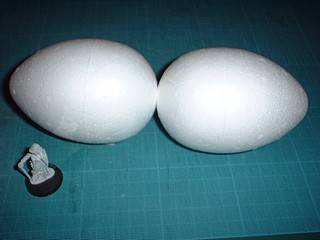
2. You cut a strip of cardboard to hide the center of the assembly, which for now is not very a "balloon". This strip may be kept in place with rubber bands the time that wood glue is drying.
3. During the drying, cut strips of newspaper. The next step is to create a texture on the ball by dipping newspaper strips into thinned wood glue and put them in the longitudinal (feel free to adapt the form of some newspaper with the forefront of eggs) and then on the vertical direction of the balloon. (Thanks to L. Pouchain for this idea).
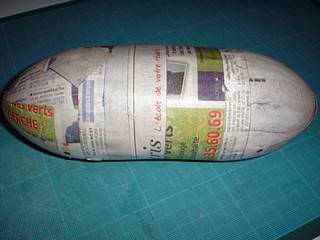
That is, the structure of the balloon is made. It remains only to undercoat all this (with a bomb, it uses less paint) and paint like you want.
The boat
Needed material
- A rectangular profile of balsa wood (5mm thick)
- Balsa wood of 5mm thick
- Balsa wood of 1mm thick (some call to replace it with cardboard of the same thickness, cheaper for the same final result, I let you judge)
- Wood glue and a glue pistol
- Clothes-pegs (many...)
- Patience (a lot of patience)
Technique
When I tell you that it takes patience, start here... The construction of a boat, it is not easy, especially when you are not skilled.
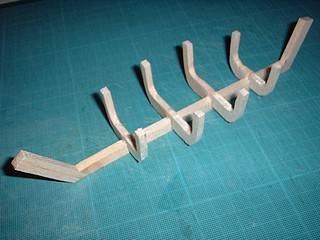
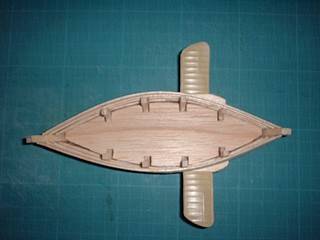
1. Inspiring with the shipbuilding techniques, I started with the frame of the boat, its "backbone". Cutting 3 sections in the rectangular profile, I gave to the boat its length: the keel. After drying, I can add 4 pieces of balsa wood with a U-shape (called "a couple" in reality) to cut its base to be able to attach to the keel (this is called a "crank") . These 4 pieces of wood were roughly drawn on the board of 5mm thick balsa wood. There are 2 larger than the others. Not to be bothered with the bottom of the boat, the bottom of the "U" formed by the couples was flattens, which will allow me to make a flat-bottomed boat (you will see that the next step is quite difficult not to bother with details...)
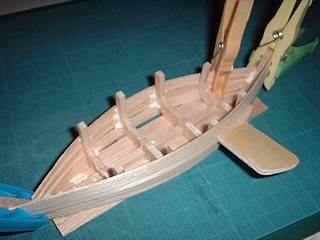
2. Once the frame completely dry, you can proceed to the side strips, who are 1cm wide cut in the 1mm thick balsa wood. These bands overlap between them (about 5mm at the stem). This operation is more difficult to achieve. The best technique I've found is to place the bands of balsa wood on the frame with clothes pegs before glue them with pistol glue. In order not to blow up the clothes pegs, you must proceed in step: 2 or 3 strips of balsa by side at a time. Here is a picture during the assembly:
3. I admit that I dribbled with the previous step, but what it is beautiful when it's over! We just have to put the bottom of the vessel and its floor. For the bottom, I am not bothered, I just glued a piece of 1mm thick balsa wood, that I cut to the shape of my boat once dry (you can see the piece exceeding the shape on the picture above). The operation is more sensitive for the floor: I drawn it by hand on 1mm thick balsa wood, that I refined until it enter in the boat to lie on the couples. A few notches to let the extension pass through and a stroke of pen to draw the floor, and "voilà"!
I used the construction of the ship to integrate the wings of the aircraft, we will see in the next chapter on how to proceed.
The assembly
Needed material
- The balloon
- The boat
- Wire
- Some decorative hooks
For "airship" accommodations
- 2 kits Revell De Havilland DH2 1 / 72 (these kits will interest us for the wings, the tail and engines, but if you find better, please do)
- A few pieces of your refills (boxes, tools, bags ...)
- A tube of putty to fill the holes on the models
Technique
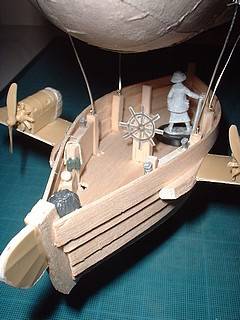
1. Hooks are integrated into the couples' wood, to simulate the attachments of the cables holding the balloon. Pieces of wire are then incorporated into the structure of the balloon, to simulate cables that can hold it. To improve the visual aspect, I glued a piece of gauze that simulates the net passed over the ball to hold it, but you can also paste pieces of string or wool around the balloon. The wire downing from the balloon are integrated into the couples' wood, along with hooks. Everything is glued to the wood glue to secure the assembly.
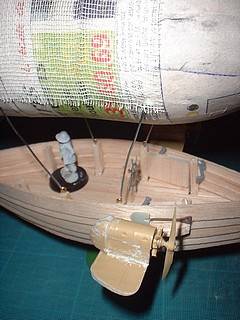
2. We just have to "arm" our airship. As mentioned above, I used two kits for Revell DH 2. Once these pieces cut to the size that interested me, I was able to form the wings and the tail. Two kits because, to agree with the proportions with 28mm figures, I glued together two wings and two tails, filling-up holes with hobby putty. Finally, the engines are those of the DH2, with the nose of the aircraft to finish the design of the front (again, putty is required). A tiller, few elements that simulate gas commands, an anchor and that is!
Inscrivez-vous au blog
Soyez prévenu par email des prochaines mises à jour
Rejoignez les 19 autres membres